

It feels like a waste to throw out perfectly good coffee grounds after brewing. But what can you do with used coffee grounds? And is there anything you can do with those leftover quality coffee cans?
In a recent article, we gave you some uses for reusing coffee grounds around your home, such as making fertilizer to keep your home smelling fresh. Today, we’re going to give you DIY coffee crafts for those awesome creators out there looking to get a little artsy and inventive with leftover coffee grounds and coffee cans.
1. DIY Coffee Scrub
Using a body scrub is a great way to exfoliate dead skin and strengthen healthy skin. This DIY coffee scrub helps slough off old gunk and grime, while adding in essential nutrients that keep your skin healthy and youthful.
This is an all-over body coffee scrub. It works especially well for areas that have stretch marks or cellulite, as the caffeine in coffee grounds may help stimulate the skin to remove marks. This DIY scrub also works well as an at-home pedicure or manicure accessory, to remove dead skin and enhance moisture.
The coffee grounds and brown sugar have strong (natural) exfoliating properties, to improve skin texture. This scrub also has almond oil and vitamin E oil, so the scrub won’t rip or damage skin—Plus they are antioxidants that are great for the health and appearance of your skin. The orange essential oil is optional, but it has additional cleansing properties (with an invigorating scent).
Get more info on the health benefits of coffee scrubs and masks here.
For this DIY project, you’ll need:
- 1 cup used coffee grounds
- 1/2 cup brown sugar
- 1/4 tsp almond oil
- 1.4 tsp vitamin E oil
- 10 drops orange essential oil
Combine all ingredients in a small bowl. Apply a small scoop of the scrub to wet skin. Gently rub in circles to invigorate skin.
Remove with a wet washcloth or paper towel. Do not wash it off in the shower, or dump it down the sink. You don’t want coffee grounds to get stuck in your plumbing!
2. Coffee Face Mask
Make that scrub a little gentler, and it works perfectly as a DIY face mask. Coffee masks are a great way to exfoliate, while plumping and enlivening skin. It has tightening effects as well, helping to minimize the appearance of large pores and fine lines.
This coffee mask recipe helps reduce inflammation and redness, fight off acne, hydrate skin, brighten and tighten, lock in moisture, and reveal a healthy and youthful glow. We also love how smooth this mask feels on the face, so it won’t rip or damage your skin, like some coffee scrubs do.
- 1/2 cup used coffee grounds
- 1/2 cup unsweetened cocoa powder
- 1 cup unsweetened milk or milk alternative (like almond milk) or filtered water
- 1 tbsp lemon juice, olive oil, or almond oil
- 1 tbsp honey
In a bowl, mix coffee grounds and cocoa powder. Add in milk and stir until pasty. For a thicker mask, use less milk.
Add lemon juice and honey. Mix and apply a thin layer to face. Let dry for 10-20 minutes. Wipe off gently with a washcloth or towel. Don’t rinse down the sink, so coffee grounds don’t end up in your pipes.
Find more coffee skincare tips here.
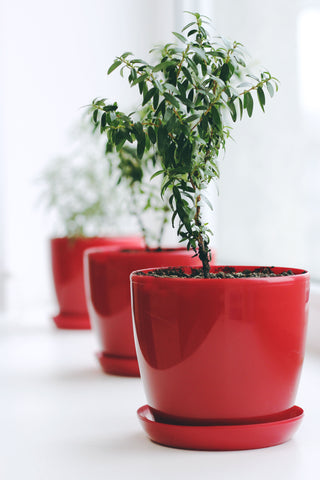
3. Coffee Flower Vase
Coffee grounds look like soil, so they work beautifully for fake flower vase centerpieces. Fill a vase with coffee grounds and fake flowers for a gorgeous, everlasting décor piece!
First, make sure your coffee grounds are dry.
Moisture could cause mold or bacteria to grow. You can paper towel them dry, or leave them in the sun to dry out.
Then, simply fill a vase or see-through container with coffee grounds.
Put in your favorite display of fake flowers. Voila! You have a beautiful flower centerpiece… that won’t die!
Best yet, coffee grounds can help remove and eliminate odors from the air. So, your centerpiece will actually keep your home fresh and clean as well!
4. Coffee Can Lanterns
What can you do with leftover coffee cans from your Eldorado Premium Coffee or Café Espresso? Rather than just throw them out, why not turn them into stunning lanterns that illuminate your backyard or home? This craft creates an elegant decoration that matches any style of décor, from rustic to minimalist to industrial. This craft requires a little extra care and work, but the end result is definitely worth it.
Rather than write out the instructions, why not show you? We love this explanatory video by Cottage Life that shows how to safely create beautiful coffee lanterns for your home!
Pro-tip: Freeze the can with ice inside first.
This helps maintain the shape of the can while you’re working on it. Also, you can use different size awls to get the shapes and designs like.
5. Coffee Scented Candles
Do you want your home to smell like a small Italian café? Do you love the aroma of coffee as much as we do?
Turn your used coffee grounds into a DIY candle, so you can enjoy that coffee fragrance all day. This is also a great way to repurpose old candles that are no longer functional, but still have some wax left in them.
You’ll need:
- A small paper coffee cup (like the kind you might get at your local coffee shop)
- 1-2 tablespoons used coffee grounds
- 1 cup wax candle remnants or store-bought wax
- Store-bought candle wick
You’ll also use paper towels, scissors, a small saucepan, and a small mixing bowl (glass or metal).
- First, you’ll want to heat your wax so it can be remolded. Add 1 cup of wax to a small heat-safe bowl. Place the bowl over the top of a small saucepan that’s filled halfway with water. This creates a double boiler. (Note: Don’t let the bowl touch the water.)
- Bring the water to a simmer. Watch closely for the wax to melt. This should take about 5 minutes.
- Place the used coffee grounds on a paper towel, and squeeze to ensure there’s no extra liquid.
- Take a clean paper coffee cup. Make sure it’s dry. Position the wick in the center of the cup, and fill the bottom of the cup with coffee grounds.
- Pour half of the melted wax over the coffee grounds. Let the wax harden for 20 minutes.
- Now, you’ll create the second layer of your candle. Rewarm the wax in the boiler. In the meantime, sprinkle the cooled wax in the cup with another spoonful of coffee grounds. Top off with the rest of the warmed wax.
- Let the candle cool for at least an hour. Once completely cooled, you can cut away the outside paper cup. This will reveal a gorgeous coffee ground double-layer candle underneath!
- You may want to trim the wick with scissors.
- Make sure you burn your candle on a safe surface, like a glass dish. Don’t burn near wood, tin, or other flammable substances.
You can also check out this video by eHow to learn how to make coffee candles.
6. Coffee as Dye
Coffee is an awesome natural DIY dye that can create a golden or brown look to fabrics or papers. It works especially well to stain natural materials like cotton, wool, and linen.
To create a coffee bath for dyeing fabrics:
- Wash the fabric, whether new or old, to remove any dirt or oil that could interrupt the dyeing process.
- Re-brew your old coffee grounds. Dark roasts create a darker tint than light or medium roasts. You may need to brew several cups to get enough for the pot.
- Fill a pot with water. The pot should be large enough to completely submerge the fabric in water. Turn the boiler on high.
- Pour the brewed coffee into the pot, and bring the mixture to a boil. Once boiling, turn off the heat.
- When it has stopped bubbling, add the fabric to the pot. Submerge fabric entirely. Stir around a bit to remove any air pockets. Use a wooden spoon to submerge fabric, without hurting yourself or staining utensils.
- Steep fabric for at least an hour. The longer it’s in the pot, the deeper the dye color will be.
- Remove the fabric, and rinse in cool water until the rinsing water runs clear. This ensures all the excess dye has been removed. Once rinsed, you can make sure it’s the color you’d like. If you want it darker, you can steep fabric again.
- Once you’ve achieved your ideal tint, prepare a large container with cold water. Add a splash of white vinegar. Let soak for 10 or more minutes to set the dye.
- Wash fabric in delicate cycle in washing machine with cold water and mild detergent. Hang to dry or dry on low setting in dryer.
- Keep in mind that coffee is a natural dye, so it will fade a bit with each wash.
- Rinse your pot well after the dyeing process. Be sure not to wash the coffee grounds down the sink.
You can also use this process to stain thick or weighty papers, like cotton or linen papers, to create an antiqued look.
How To Store Coffee Grounds
You want to be careful about how you store your used coffee grounds. If they’re still wet when you put them in storage, the moisture can start to breed mold or bacteria.
- Dry out coffee grounds before storing them. You can do this by squeezing and patting the grounds dry in a paper towel, or spreading out on paper towel and letting them air dry in the sun.
- Place the coffee grounds in an airtight container. You can even use an empty coffee can. Mason jars or small plastic storage bins work well also.
- If you plan on using your coffee grounds in the next week or so, you can store them in the fridge. Don’t keep them at room temp, because they can get moldy.
- If you won’t be using your coffee grounds for some time, or you’re creating a bigger stockpile for certain crafts, freeze them in an airtight container.
Psst… Do you know how to perfectly grind your coffee beans? Learn how to grind at home for the best brew every time—before reusing those grounds!
How do you like to reuse your coffee grounds and cans? Share your DIY projects on social media, and tag Eldorado to be featured!